Prior to macOS 11 Big Sur, cleaning up development disk space by deleting old iOS or watchOS device support versions and Xcode caches was something of a pain, requiring command-line calls to directories scattered in a number of different places. For example to delete Xcode cache you might run something like this.
rm -rf ~/Library/Caches/com.apple.dt.Xcode/*
You might also have to track down several other folders to do a clean job of it and then still have to find old device support versions in these directories.
~/Library/Developer/Xcode/iOS DeviceSupport
~/Library/Developer/Xcode/watchOS DeviceSupport
Trying to find development-related system files in macOS prior to Big Sur was likewise not simple in the UI. Going through the Apple menu and About This Mac then Storage and even Manage... did not help.

Enter Big Sur and the Developer Storage Section
With macOS 11 Big Sur, Xcode developers everywhere should be ecstatic about the new Developer section on the storage management view above. Once you go to the Apple menu then About This Mac and then Storage, you’ll see the colored storage map has a new section called Developer.
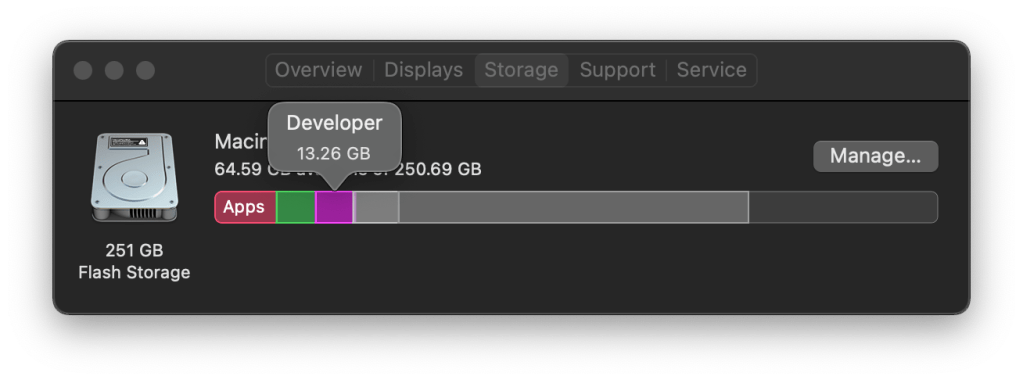
Additionally, if you now use the Manage... button, you’ll see that new Developer section reflected as available to manage, with sections for caches/archives as well as iOS and watchOS device support.
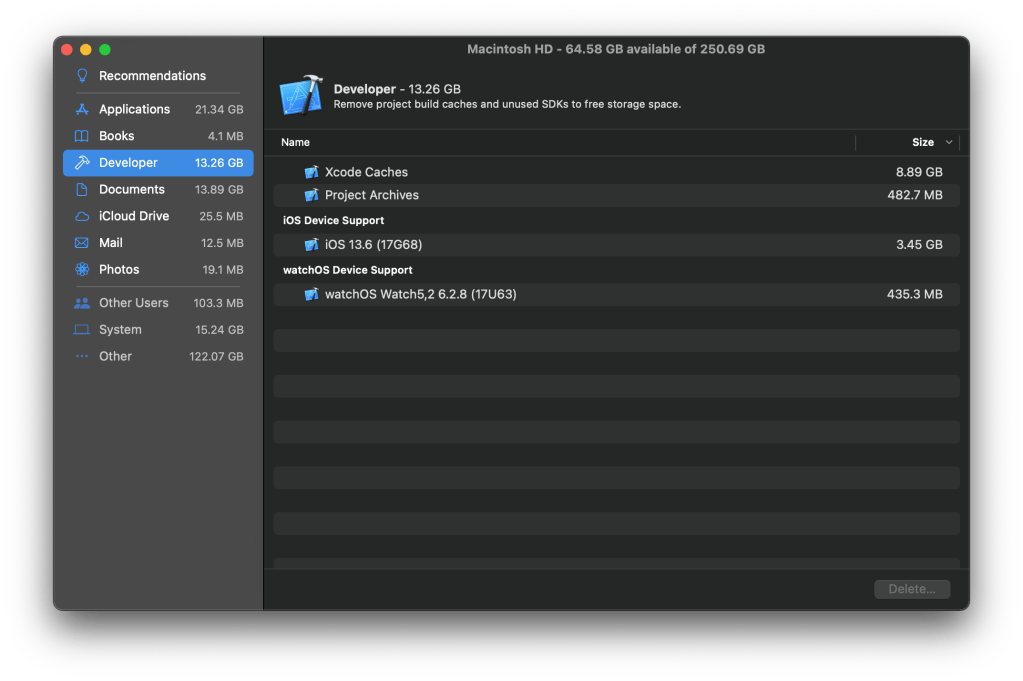
Freeing up disk space by deleting any of the above items is as simple as right-click and selecting Delete. In the view above, some old device support versions from Xcode 11 are available to be safely deleted (assuming I don’t still want to target iOS 13 for example) since I’ve moved on to Xcode 12. In the view below, you can see the Delete menu for Xcode Caches being used.

Enjoy the Free Disk Space!
It can sometimes be a true horror story trying to free enough disk space to do something basic like updating the operating system or installing multiple versions of Xcode. The macOS Big Sur betas required a whopping 50GB free before installing, for example. It took some juggling on my 250GB SSD to make that work. I’m glad Apple is providing the tools to finally start managing some of the temporary Xcode files to make similar tasks simpler.
I’d definitely recommend all new developers start with a minimum of 500GB for disk space on new workstations or MacBooks; but that’s not always possible for budgetary or other reasons. If you’re stuck in that situation, hopefully this will help!
