Since Xcode 11, when Apple introduced Xcode Test Plans for simpler, more configurable test management and execution, both new and existing projects had to manually convert to using the new system or create new test plans from scratch. Test plans, if you are not familiar, allow one file to control one or more test configurations for a set of tests, and allow multiple languages, simulated locations, test settings, and more to be exercised in just one test run. Especially for localized applications, white label apps, or scenarios with complex build configurations, they can be a huge time saver.
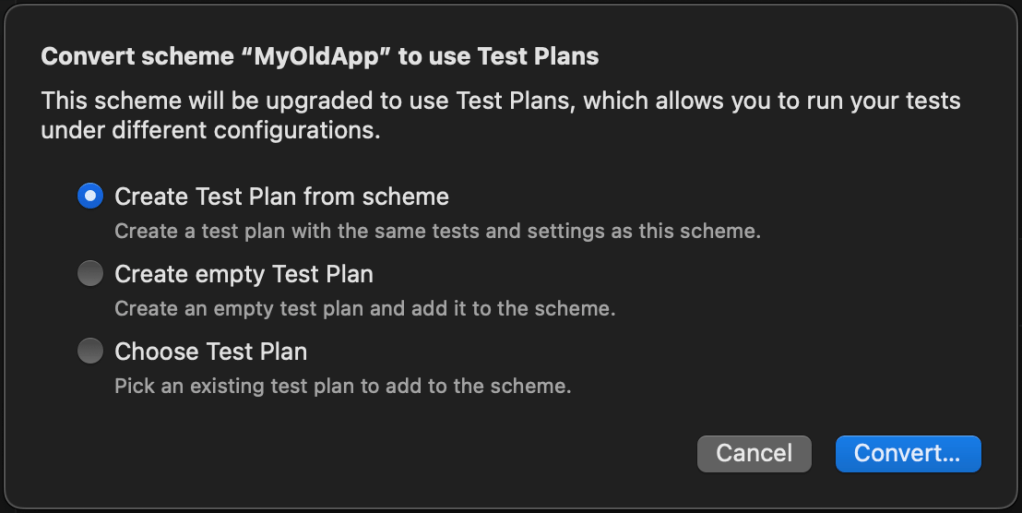
It’s not a huge effort doing so, but to switch to test plans, you have to open your existing scheme and go to the Test section, then tap the Convert to use Test Plans… button.
From the following dialog, you would then pick Create Test Plan from scheme, Create empty Test Plan, or Choose Test Plan.
New Projects Now Default to Test Plans
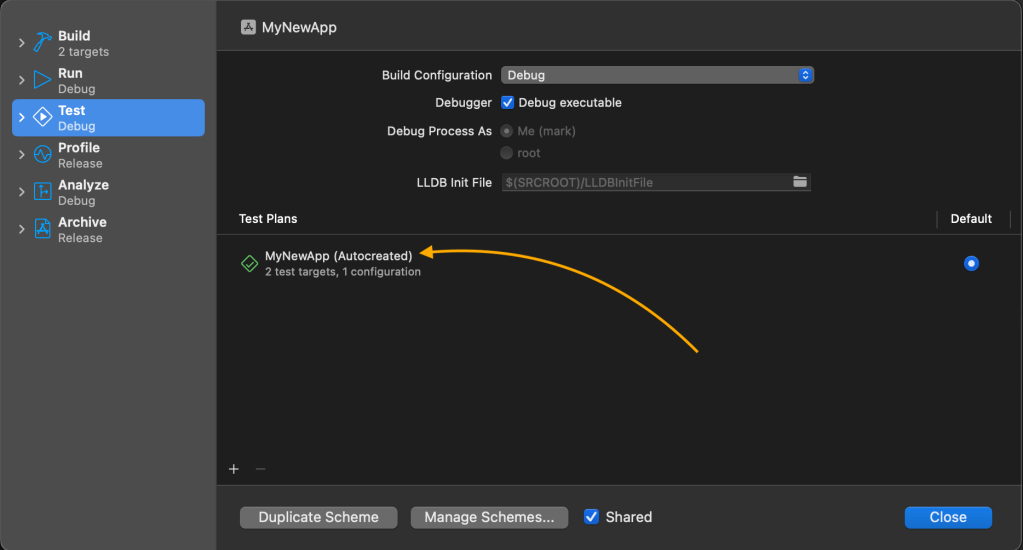
With Xcode 14.3, this step is no long required for newprojects as Xcode now defaults to using a Test Plan for all new projects. This default test plan is marked as Autocreated in the Test Plan editor and can be viewed and modified just like normal. For a new project, if you open the default scheme, the test plan will be listed under the Test section and the conversion button will not appear.
Opening the new Test Plan then shows a normal test plan that looks completely as expected with the only difference being the Autocreated in the test plan navigation tab.
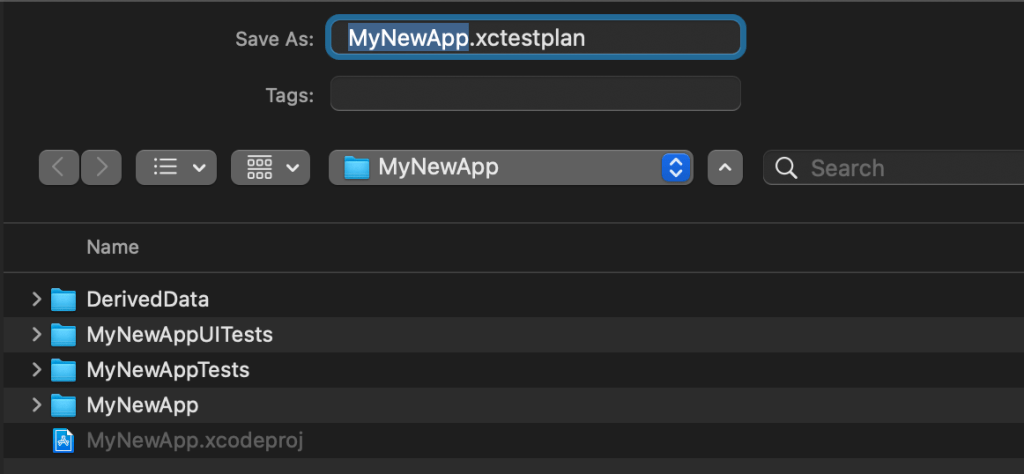
Once you make any changes to the plan; however, it will force you to save the plan immediately.
After you have done that, the Test Plan will be visible in the Navigator pane and behave like any other Test Plan.
Wrapping Up
This change is a small added convenience for new projects only that should reduce the need for the Create Test Plan from scheme option down the road and reduce friction for developers either new to Xcode or spinning up new projects. If you’ve never tried out Test Plans, I’d strongly suggest learning more and using them as they simplify many automation and testing scenarios and can greatly reduce the amount of effort needed to test your code. If you’ve got an existing project without test plans, this change doesn’t help much (sorry!); but maybe it’s time to check them out.
Since SwiftUI came out, the extremely useful List control, for creating scrolling, single column, table-style views has been backed under the hood by UITableView. While this probably made it simpler and faster to release the feature, it also had the side effect of tying SwiftUI implementation to a lot of legacy code.
With iOS 16, Apple released this small blurb in the release notes:
The implementation of List no longer uses UITableView. (81571203)
Other issues aside, this is an awesome change as it moves everyone closer to that glorious day when Swift can shed the baggage of Objective-C (I can dream anyways 😀).
There is one minor side effect to note from this change that impacts UI tests though. Previously one would have written code to access elements in a SwiftUI List with something like:
let app = XCUIApplication()
// Do something with a button in a List
app.tables.cells.buttons["Tap Me"].firstMatch.tap()
Now since List is no longer backed by legacy code, XCUITest no longer recognizes any tables or cells in the above code. You simply have to use otherElements to work around the issue for now.
let app = XCUIApplication()
// Do something with a button in a List
app.otherElements.buttons["Tap Me"].firstMatch.tap()
This change may cause some issues of course; but it’s pretty typical when new iOS versions come out to have some undocumented (or sparsely documented) changes around XCUITest behavior.
For example the SwiftUI Stepper finally exposes the increment and decrement buttons to XCUITest. With previous versions of iOS and SwiftUI, calling tap() on the stepper in an XCUITest would increment the stepper and nothing else. But steppers need to go down too, right? Without a lot of extra work and coordinate tapping to hit the decrement button, that is.
Now the buttons within the Stepper are available as buttons["Increment"] and buttons["Decrement"] and our tests can do so much more!
let app = XCUIApplication()
// Previously could only increment (+1) stepper
app.steppers.firstMatch.tap()
// Now we can actually go up AND down
app.steppers.firstMatch.buttons["Increment"].firstMatch.tap()
app.steppers.firstMatch.buttons["Decrement"].firstMatch.tap()
It definitely seems like the XCTest framework in regards to SwiftUI is still very much in flux but slowly getting better. I’ll be filing a feedback so that we can maybe break out some of these issues with otherElements (which tends to be a grab bag of unclassified items).
Thanks for reading! Please feel free to comment, share, like, etc. and let me know what you think.
As a budding mobile developer back in early 2012 working on my first app, everything about iOS was new and different from the .NET world with which I was familiar. Living in the Denver area at the time, I stumbled upon this local conference named 360|iDev. What I found there was an awesome experience with great developers from all over, fascinating talks, and community.
It helped invigorate my technical side and kept me motivated to stick with the new world (to me at the time) of mobile apps I went back in 2013 and 2014 and found an equally engaging experience that kept driving me forward. There’s was something about the friendliness and community at the smaller conference that I never saw later at larger venues like I/O or WWDC.
This week, I was finally able to attend 360|iDev again in person in Denver; but sadly it will likely be the last. John Wilkers announced yesterday that the conference’s run is finally over. To me it was emotional and sobering seeing this great event no longer able to viable in our Covid-endemic, “new normal” world. It certainly leaves a large gap in the iOS conference landscape.
Keynote 2022
As I travel back to the Boston area, I can say that I thoroughly enjoyed this latest experience, the knowledge learned, and especially the people and camaraderie at these special events. I’ve also gained a sincere appreciation for the effort it must have taken to continue the conference year after year, virtually through the pandemic, and finally in person again. I hold out hope that some iteration of the conference will survive; but if it doesn’t, I’ll look back on it fondly. 🥹
Since writing about dealing with continuous integration and Apple Silicon as well as retrying failed tests, I’ve been thinking some more about iOS and Xcode test automation and would like to share some useful tips and thoughts on that front. Hopefully these pointers will help you out with something with which you might be dealing or that you might see in the future in your iOS, iPadOS, or other apps.
Automate, Automate, Automate
Even if you’re a developer working on your own code (and possibly especially in that case), automating your UI (and other) tests so that they can be run asynchronously from the rest of your work flow is critical to improving productivity. While unit and even integration tests tend to run in seconds and very quickly, it’s common for UI tests to take as long as the user would (and sometimes longer given app spin up times, etc.). This can tie up your machine and work flow if you are running them interactively through Xcode itself. Watching console messages fly by can be addicting but isn’t what I’d prefer to do all day. 😀
Consider using a tool such as Xcode Cloud (when it comes out beta or the wait list opens up) or Jenkins (even if installed locally on your laptop) to make your processes simpler. You could also look at third party services such as Firebase Test Lab or AWS Device Farm as well – although be aware of free vs. paid tier thresholds.
Being able to kick off a test suite in the background and headless on check in or with just a mouse click can free your time to focus on other more interesting tasks. There is certainly effort, planning, and monitoring that is necessary with setting up automation; but in my experience the effort has paid off in the long run. Give it a shot if you haven’t! I think you’ll find it very cool to get working and rewarding as well.
Consider Third Party Libraries
Yes, it’s always possible to write every last piece of code yourself and fully control all of your source. This need or desire has to be balanced, though, against real life and getting work product out the door. If you find yourself writing a ton of repetitive or hard to manage test code, consider testing and/or matching frameworks like Quick, Nimble, or Google’s EarlGrey 2 to simplify some of your UI test logic. For purely test scenarios, third party integrations present somewhat less risk than frameworks that ship with your app in production binaries.
For example, here’s a simple case of an XCTAssert statement converted to use the Nimble expect function.
// with XCTAssert
XCTAssertEqual(grass.color, .green)

// with Nimble
expect(grass.color).to(equal(.green))
As you can see, readability and intention is more clear with the Nimble test assertion. Where Nimble shines as well is providing useful syntax for UI tests that have to wait and block with toEventually. In the example below, we’re waiting for that grass to green up for three seconds and checking every 250 milliseconds.
You will want to keep in mind that adopting one of these frameworks involves writing tests in a different way than you might have done in the past. Converting back to standard XCTAssert type tests may be difficult and time intensive if you change your mind. As with any third party library, try it first in a limited capacity and be sure you want to stick with it before adopting wholesale.
isHittable versus exists
When getting started with Xcode UI testing, it’s pretty common to be tossing around isHittable and exists interchangeably (or possibly only use exists). As the Apple developer documentation points out though about exists:
“The fact that an element exists does not imply that it is hittable. Elements can exist offscreen, or exist onscreen but be hidden by another element…”
I’ve been burned a few times using exists with buttons and labels hidden behind alerts, offscreen in a table view, or displaying only partially through the safe area. They technically exist but cannot be tapped by the user and may not be visible. isHittable is a better check for element accessibility than exists if any of these cases are a possibility.
// Using `isHittable` to verify our label both exists and can be seen/tapped
XCTAssertTrue(app.staticTexts["Hello, world"].isHittable)
Note though that isHittable is not a perfect visibility check as it will still return true for views that are onscreen but hidden by other views in the same hierarchy (e.g. a Text SwiftUI view lower and completely covered in the ZStack by another view). isHittable is more about your views being covered by form sheets, modals and alerts, or being scrolled offscreen.
Accessibility Identifiers Are Your Friend
It’s pretty common when spinning up UI tests, either manually or from UI recording, to just use the UILabel text or the UINavigationBar title as the identifier for the element you are addressing. However Xcode provides the very useful accessibilityIdentifier property (accessibilityIdentifier(_:) in SwiftUI) to let you uniquely identify every element in your UI. It is meant for UI automation and does not impact Voice Over or actual app interaction.
(Note that Apple has deprecated the SwiftUI accessibility(identifier:) method in favor of the one above as of iOS 14.)
Using the accessibility identifier can help insulate your UI tests from having to be updated when the text on a view changes. For tappable elements like buttons, this can be very useful when you just need to tap a button but don’t care what it says. Note that using an accessibility identifier does not preclude you from still checking the correctness of the text or value of an element through the label or value properties.
// Using the text from a label as the identifier. If the
// text ever changes, this will fail.
XCTAssertTrue(app.staticTexts["Hello, world"].isHittable)

// Setting the accessibility identifier in SwiftUI
Text("Hello World")
    .accessibilityIdentifier("Home_View_Label")

// Label using accessibilityIdentifier will have different identifier and label properties
// StaticText, 0x132053b20, {{0.0, 0.0}, {88.0, 20.5}}, identifier: 'Home_View_Label', label: 'Hello World'

// Using the accessibility label from a label as the identifier
XCTAssertTrue(app.staticTexts["Home_View_Label"].isHittable)
Be Careful of Testing Negative cases
When writing UI tests and using XCTAssertFalse, be aware that a query that returns zero elements can return false as well. If we consider the case below, we would expect the first cases where we are testing for an invalid identifier (‘XYZ’) to fail the test at run time with an ‘element not found’ type error. Instead the all of these tests will pass because a query with no elements is considered unhittable.
// All of these statements pass regardless of whether an actual element exists or not

// Element was never defined
XCTAssertFalse(app.staticTexts["XYZ"].firstMatch.isHittable)
XCTAssertFalse(app.staticTexts["XYZ"].isHittable)

// Element was defined but is hidden by a form sheet
XCTAssertFalse(app.staticTexts["Home_Hidden_Label"].firstMatch.isHittable)
If you aren’t careful, you might think you have tested that a label got covered up by a form sheet; but because of a typo in the identifier are really not testing anything at all.
Be Prepared for Instability and Unexpected Behavior
When writing unit tests against iOS, iPadOS, or really any platform, dependencies are mocked out, there are fewer moving parts, and tests run reliably – over and over and over. Once you start introducing dependencies and live data, it’s possible that some level of instability may creep in. If you are coding and running integration tests, for example, against a live API, success will depend very much on the stability and availability of that API.
With UI tests, in addition to the dependency on live API, the simulator and its host operating system can become an additional source of problems and failed tests. In my experience, there have been quite a few scenarios running iOS UI tests where the simulator has crashed, stalled, or done something unexpected. The most common scenarios are system popups, system overlays, app rating dialogs, and other events that pop user interface elements on top of your app in an unexpected way. Most of these can be dealt with in code one way or the other but you need to be prepared.
But I also have found UI testing through xcodebuild to occasionally crash or hang the simulator. In some cases the causes of the events have been code-related but not always. Resetting simulator state, uninstalling the app prior to testing, and similar remedies can help if you are running into those kinds of problems.
Enjoy Testing!
Hopefully some of this will help you as you automate your application and improve your apps. Please let me know if you have any thoughts in the comments and feel free to like, follow, share, etc.
So like probably more than a few people, we jumped in and bought two of the new Apple silicon M1 Mac Mini’s to replace a couple aging Intel-based build servers at work. Our old servers were running Jenkins with a pretty standard configuration to build and test our iOS apps.
The initial transition was pretty straightforward – install HomeBrew, Xcode, and all of our other tools, copy Jenkins configurations and plugins to the new box, etc. Despite having a mixed Swift/Objective-C app with various dependencies as included frameworks, CocoaPods, and Swift Package Manager frameworks, the initial setup and testing went pretty smoothly for our build servers. Performance was stellar with the new servers running about 66% faster than the old 2015-era Mac Mini’s.
All of our framework and other builds not requiring simulator interaction went fine. Where things started to go poorly was around building our UI testing schemes when simulators were involved (either through Xcode or command-line with xcodebuild). In the hope that it helps someone else, I’ll outline a sample error that we saw, some possible solutions, and the workaround we’ve settled on for now till we can address the problems in full.
Issues and Possible Fixes
Most of the issues that we’ve found to date can be traced back to frameworks and third-party dependencies not built with all of the necessary architectures included. For example, if you have an included framework with an incompatible binary, you might see an error like this:
Could not find module '<module name>' for target 'x86_64-apple-ios-simulator'; found: arm64, arm64-apple-ios-simulator, at: <path to module>.swiftmodule
Other errors can occur and typically reference missing architectures and the like. Most of the fixes that can work and make your project and its dependencies compatible on an Apple silicon macOS machine seem to boil down to either:
Building for all architectures – By default if you create a new Xcode project only the current active architecture is built for the Debug configuration.
Building only the active architecture lets your project compile faster but doesn’t necessarily support multiple architectures. On actual iOS devices, the Build Active Architecture Only setting hasn’t been a huge deal for quite a few years (32-bit anyone?). It hasn’t been an issue with simulators either lately; but with the advent of Apple silicon chips, we now have the arm64e architecture to worry about on desktops as well.
Some of the issues you may run into can be addressed with Debug schemes by changing the Build Active Architecture Only setting to No for all cases. This can be done through Xcode manually or through podfile configuration if you are using CocoaPods. One very real and frustrating problem that I have not seen a solution for yet however is changing this setting for frameworks integrated via Swift Package Manager.
Adding missing architectures – Another approach that can work in some situations is adding missing architectures to the Architectures setting above instead of just using Standard Architectures. Adding x86_64 in some cases if you’re on an M1 Mac dealing with an Intel-based project (or arm64e in other cases) can make a difference. I’ve not had much luck with this though and once again this will not help you fix dependencies that are pulled in via SPM.
Getting the dependency fixed – By far the preferred solution over any of the above for fixing dependencies is to communicate with the framework owner and get them to re-compile and distribute their framework as an XCFramework compatible with all architectures and devices. For code that you own, this should be pretty straightforward; but for many dependencies this can be a significant problem. It’s also not always possible to just dump a core dependency quickly for something more compatible.
Working Around Issues in Xcode
So you’re stuck for one reason or another or just don’t have time to deal with the problem (and won’t let those shiny new Macs go to waste 😀). I’ll freely admit that I’m in the latter category currently, with more work than time. So what to do?
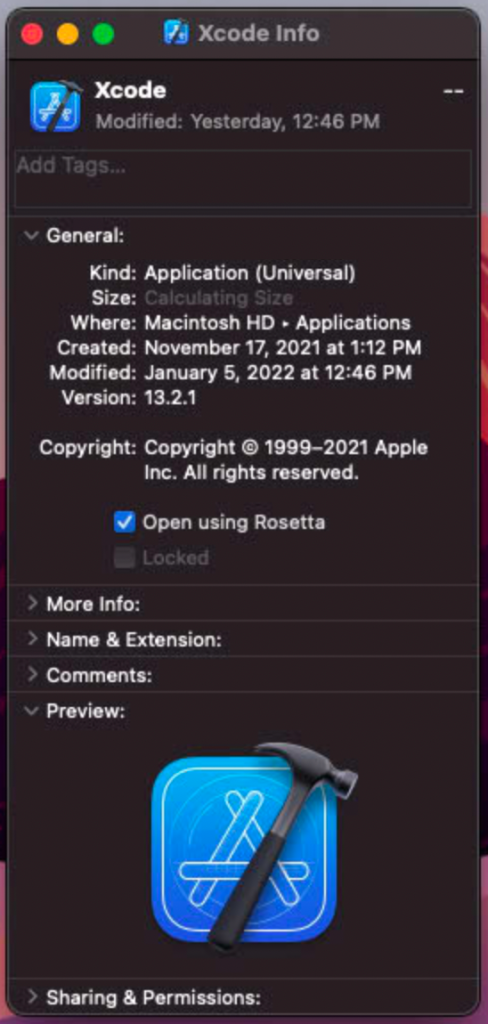
The simplest approach that should fix all of your problems within Xcode itself is running the application with Rosetta (which allows running x86_64 instructions on Apple silicon machines). Turning it on and off is trivial and done via the Get Info menu option under the Xcode application context menu. Note that this setting will obviously only show up on macOS running Apple silicon.
Open using Rosetta
Just set the Open using Rosetta checkbox and you’re off and running. Your builds from the desktop should work as if they were running on an Intel-based machine again. Problem postponed…
Working Around Issues on the Command Line
Now if you’re trying to get continuous integration (Jenkins, etc.) working and xcodebuild is throwing the same errors, you’ll need to use the arch command to run with the x86_64 architecture (if you’re on an M1 Mac for example running an Intel-compatible project). It’s as simple as
arch -x86_64 xcodebuild test <xcodebuild switches and settings>
This will fix your issues by running the specified command (xcodebuild in this base) with the x86_64 architecture. Once again, problem postponed…
Postponed not Fixed…
I said “postponed” above for a reason. While you might be able to survive for a little while (months, a year, or even longer) with the hacks above, putting a band-aid on your Apple silicon issues are not going to make them go away. Take the time you have bought yourself and start to research and fix the core issues that you are running into. Check out Apple’s extensive documentation for developers.
It shouldn’t matter whether you are on an Intel or Apple silicon machine when you are developing. Fixing your project and your apps so you can run natively anywhere while not losing time on either will only benefit you and your users in the long run.
Thanks for reading and as always please feel free to comment, share, follow. etc.
As developers we never want our tests to fail, but there are often real world cases, especially with UI and integration tests against actual API (as opposed to a stable mock API or static data), where tests can and will occasionally fail. For example, API’s may go down, dependent data may change, or the Xcode Simulator may just crash. Now while none of these are good things to have to deal with and/or debug and testing against unstable API’s or databases is never best practice, this is also the real world. You may have to at least temporarily deal with legacy architecture, systems out of your control, QA environments with unstable data and code, or something similar.
If you are using a continuous integration (CI) enviroment such as Jenkins or Xcode Cloud to run your unit, integration, or UI tests, it’s also crucial that these test runs only fail in the correct scenarios. Nothing derails the developer acceptance of the need for automated testing more quickly than repeatedly chasing red herrings and getting stuck in the manual “just rerun the test to fix it” cycle. Consistently seeing failed yellow warning icons from tests will rapidly inure even the best developer to paying close attention to automation issues.
Up until recently, there was no way to handle test repetitions on failure in Xcode without creating custom script retry/fail logic. With Xcode 13 however, Apple finally provided developers with most of the tools they need to survive these situations, both through the UI and the command line with xcodebuild. As described in the WWDC 21 at the Diagnose unreliable code with test repetitions talk, you can now retry tests for a fixed number of repetitions, retry tests until a failure occurs, and retry tests upon failure. Each one of these scenarios has some specific use cases and can help flush out unstable and unreliable code; but I’m going to focus here on that last option to retry individual failed tests until they succeed.
Retrying Failed Tests through Xcode UI
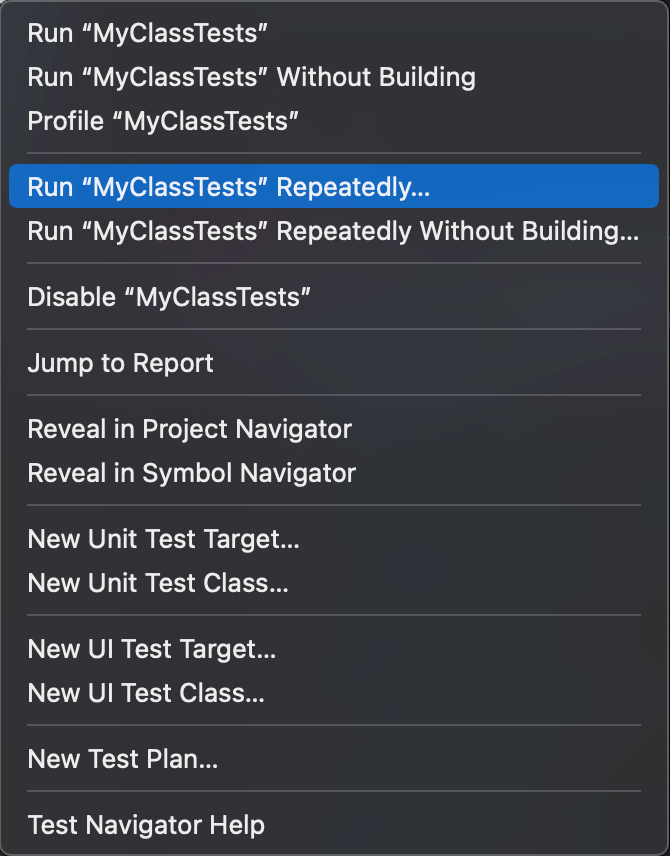
If you right-click on the diamond test icon for the test or group of tests that you want to run in Xcode 13, you’ll see the Repeatedly… and Repeatedly Without Building… options available.
Test Repetition Menu
Selecting one of them will show the basic test repetition menu below. By default, you will see the following options selected.
Test Repetition Dialog Default
To retry tests after failure until they succeed, we simply need to set Stop After: to Success like so and set the maximum repetitions if necessary.
Test Repetition Dialog with Retry on Failure Set
Retrying Failed Tests through Xcode Test Plans
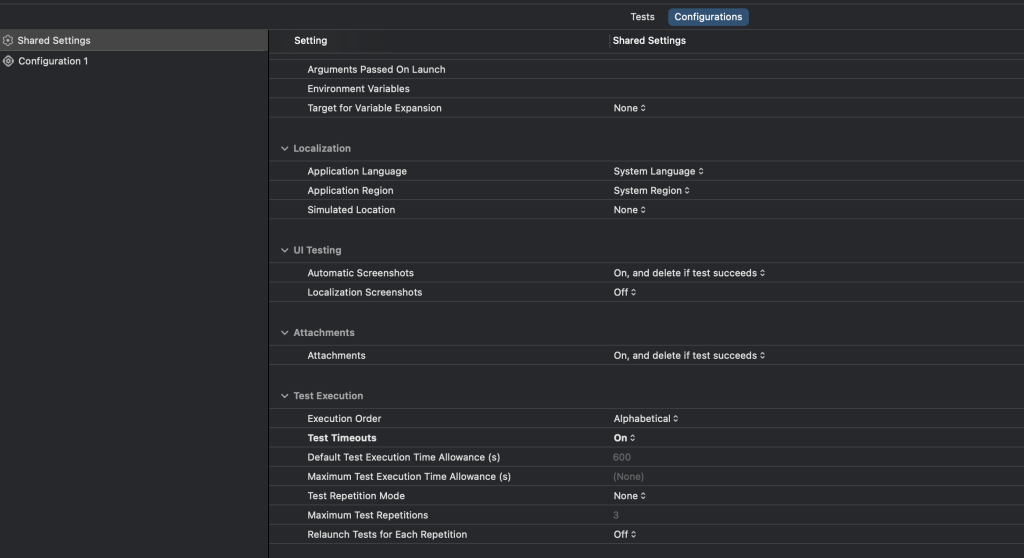
The above technique is great but gets old very quickly if you need to run tests over and over. So what do we do? Xcode Test Plans to the rescue! Introduced with Xcode 11 and also discussed back at WWDC 2019, test plans provide an easy way to run tests against multiple configurations for locale, debugging tools, environment settings, and more. With Xcode 13, Apple provided a number of new settings for each test plan configuration under the Test Execution section
Default Xcode Test Plan Settings
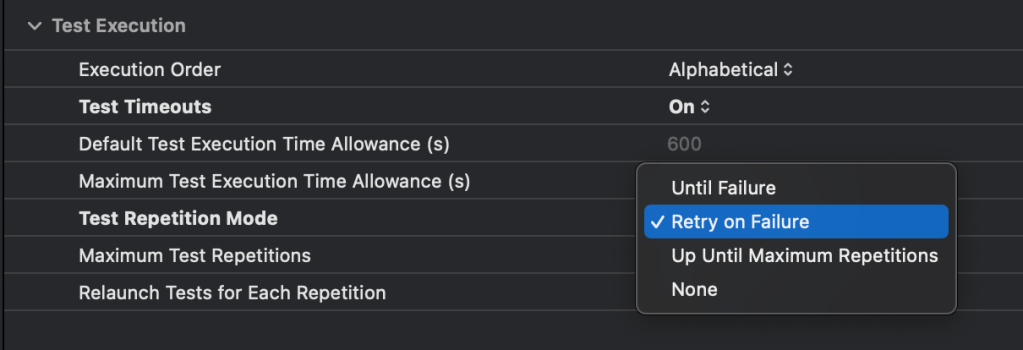
We’ll be focusing here first on the Test Repetition Mode setting. Set to None by default, we will need to select it and set Retry on Failure. You would normally also want to specify the default number of test repetitions to try after failure to something reasonable.
In the screenshot below, we’ve set things up so that we will retry on failure up to 5 times.
That’s it! Once you’ve set this up, when you run tests against your test plan either through the Xcode UI, Xcode Cloud, or the command line, each unstable test will be retried up to the maximum number of times or until it succeeds. To use a test plan in a CI environment via the command line, it’s no different than normal.
xcodebuild -testPlan <my test plan name> -scheme <my scheme name> -destination <destination simulator or device> test
You can always override the test plan settings when testing manually by using the context menu method above as well.
Retrying Failed Tests with xcodebuild
If you are just working locally or are able to leverage Xcode Cloud, that’s great but I suspect most CI integrations out there these days are still leveraging the command line and the venerable xcodebuild tool to build, test, and archive iOS, iPadOS, and macOS projects. Luckily for us, Apple took this into account and added a number of new switches with Xcode 13. The following documentation is from the man page for xcodebuild.
-test-iterations number. If specified, tests will run number times. May be used in conjunction with either -retry-tests-on-failure or -run-tests-until-failure, in which case this will become the maximum number of iterations.
-retry-tests-on-failure. If specified, tests will retry on failure. May be used in conjunction with -test-iterations number, in which case number will be the maximum number of iterations. Otherwise, a maximum of 3 is assumed. May not be used with -run-tests-until-failure.
-run-tests-until-failure. If specified, tests will run until they fail. May be used in conjunction with -test-iterations number, in which case number will be the maximum number of iterations. Otherwise, a maximum of 100 is assumed. May not be used with -retry-tests-on-failure.
-test-repetition-relaunch-enabled [YES | NO] Whether or not each repetition of test should use a new process for its execution. Must be used in conjunction with -test-iterations, -retry-tests-on-failure, or -run-tests-until-failure. If not specified, tests will repeat in the same process.
For the basic “retry on failure” scenario that we’ve been discussing so far, we only need to be concerned with the first two options, -test-iterations and -retry-tests-on-failure. An example of building command line to retry each test test up to 5 times on failure of that test for an iOS simulator device might be something like this:
xcodebuild -retry-tests-on-failure-test-iterations 5 -scheme <my scheme name> -destination 'platform=iOS Simulator,name=iPhone 13 Pro Max' test
There isn’t that much else to repeating your failed tests other than the above switches. You can play around with the settings yourself. Be sure to use man xcodebuild or xcodebuild --help and review the documentation yourself if needed.
A Couple Warnings
There are two important caveats/warnings if you are trying to use test repetition that have caused some pain for me.
Relaunch with Test Repetition – You might expect that if you combine the -retry-tests-on-failure with the -test-repetition-relaunch-enabled setting that only the failed tests would launch in a new process. That is not currently the case and all of your selected tests – passed or failed – will rerun if just one test fails and the latter setting is set to YES. The run will still honor the maximum test repetitions but every single test will have to succeed for the test run to complete. This isn’t that big a deal for short test cycles but can be a killer if you’re running a UI test suite that takes, for example, an hour to run. This applies whether you are using the Xcode UI or command line.
Reporting Conversion – Third party tools such as xcpretty or trainer, which convert xcresult output to JUnit report format may not be set up to parse successful retried tests as test successes. This can result in still seeing the dreaded yellow status in Jenkins even though a retried test eventually succeeded. You may need to trigger your Jenkins pipeline result off of something other than the parsed test result such as the (** TEST SUCCEEDED ** in the output). I’m still working through the best way to handle this and looking at this in more depth (suggestions welcome here!).
Final Notes
I hope this helps someone out there needing to retry their tests on failure. I am well aware that even having to consider using these settings and tools mean that best practices may not be in place. If you are using retry on failure regularly for unit testing or situations where the entire test environment is under your control, you might consider digging into those issues sooner rather than later. That said, if you are fighting some real world scenarios or using Xcode’s testing capabilities for a budget status dashboard, for example, retrying on failure can make a positive difference.
Thanks for reading and as always please feel free to comment, share, follow. etc.
In this post, we’ll look at these new capabilities and dig deep to see how to extend the new ParseableFormatStyle and related protocols to make our own custom phone number formatter. Then we’ll use that to actually format SwiftUI TextField input. Please note that while I will be focusing on iOS here, these new protocols are available in macOS, watchOS, and tvOS as well as of Xcode 13.
The Old Formatter Way
Prior to iOS 15 and Xcode 13, in order to convert a number or date to a string, you would have had to do something like the following:
let dateFormatter = DateFormatter()
dateFormatter.dateStyle = .long
dateFormatter.timeStyle = .none
let formattedDate = dateFormatter.string(from: Date())
// August 14, 2021

let numberFormatter = NumberFormatter()
numberFormatter.numberStyle = .currency
numberFormatter.maximumFractionDigits = 0
numberFormatter.currencyCode = "USD"
let formattedNumber = numberFormatter.string(from: 1234)
// $1,234
First you’d instantiate an appropriate Formatter class object, then adjust properties to control the input or output formats, and finally call a method to return the desired string. While this works (and will continue to), there are a couple downsides to this approach:
Formatter derived classes can be expensive to instantiate and maintain and, if not used correctly in looping, repetitive, or other situations, can lead to slowness and excess resource usage.
Coding formatters often requires specific syntax (date format strings, anyone?), usually takes multiple lines of code, and setting multiple properties on the Formatter object. This make the coding process more complicated/slow and less maintainable.
A Simpler Way to Create Formatted Strings
With iOS 15 (and the latest versions for watch, iPad, etc.), we can now convert certain values such as dates and numbers to strings much more easily while still maintaining specific control over the process. For example, we can now create strings like so using nice, 1-line, fluent syntax.
let formattedDate = Date().formatted(.dateTime.month(.wide).year().day())
// August 14, 2021

let formattedNumber = 1234.formatted(.currency(code: "USD").precision(.fractionLength(0)))
// $1,234
Simpler! As you can see, no Formatter variant is needed and we can do most of what we need to do in just one line of code. Code completion and the online documentation can guide you through the basics of these formatters; but we want to take things a step further.
Creating Your Own Custom Formatter
So let’s assume that we have some other type of data, such as a custom object that may contain a phone number, that we want to parse and output in a very specific but flexible way. Previously we would have had to sub-class the Formatter object, instantiate the new class, and format like we did above in our initial example. Now with several new protocols, including ParseableFormatStyle and ParseStrategy, we can write our own code that looks and behaves like Apple’s built in formatting and parsing code for dates and numbers. So let’s do it!
The Key New Formatting Protocols
At the core of the new functionality are a couple important new protocols. The first is ParseableFormatStyle which exposes, through the FormatStyle protocol, formatting and locale-specific functions. Objects that can manipulate data from one type to another can call the format(_:) method, shown below, to do so.
/// A type that can convert a given data type into a representation.
@available(macOS 12.0, iOS 15.0, tvOS 15.0, watchOS 8.0, *)
public protocol ParseableFormatStyle : FormatStyle {

    associatedtype Strategy : ParseStrategy where Self.FormatInput == Self.Strategy.ParseOutput, Self.FormatOutput == Self.Strategy.ParseInput

    /// A `ParseStrategy` that can be used to parse this `FormatStyle`'s output
    var parseStrategy: Self.Strategy { get }
}

/// A type that can convert a given data type into a representation.
@available(macOS 12.0, iOS 15.0, tvOS 15.0, watchOS 8.0, *)
public protocol FormatStyle : Decodable, Encodable, Hashable {

    /// The type of data to format.
    associatedtype FormatInput

    /// The type of the formatted data.
    associatedtype FormatOutput

    /// Creates a `FormatOutput` instance from `value`.
    func format(_ value: Self.FormatInput) -> Self.FormatOutput

    /// If the format allows selecting a locale, returns a copy of this format with the new locale set. Default implementation returns an unmodified self.
    func locale(_ locale: Locale) -> Self
}
When we create our own parser for our object type, we’ll also need to implement the new ParseStrategy protocol to control the actual parsing process from the formatted type back to the type being formatted.
/// A type that can parse a representation of a given data type.
@available(macOS 12.0, iOS 15.0, tvOS 15.0, watchOS 8.0, *)
public protocol ParseStrategy : Decodable, Encodable, Hashable {

    /// The type of the representation describing the data.
    associatedtype ParseInput

    /// The type of the data type.
    associatedtype ParseOutput

    /// Creates an instance of the `ParseOutput` type from `value`.
    func parse(_ value: Self.ParseInput) throws -> Self.ParseOutput
}
Creating our Parsing Strategy
So let’s start our new custom phone number format style! For our example, we’re going to create a simple PhoneNumber object that we need to convert into a standard U.S. formatted phone number string with the style (<area code>) <exchange>-<number>. As a bonus, we’d also like to be able to remove the parentheses, hyphen, and/or space between the area code and number as well as maybe display the number without the area code.
/// Representation of U.S. phone number
public struct PhoneNumber {

    /// Area code
    public var areaCode: String

    /// First three digits of a 7-digit phone number
    public var exchange: String

    /// Last four digits of a 7-digit phone number
    public var number: String

}
Now that our object type has been defined, our next step is going to be to create a ParseStrategy to allow conversion from a String type back to our custom PhoneNumber type. There are obviously many ways to implement the actual parsing but this will do for our fairly simplistic example here.
public struct PhoneNumberParseStrategy: ParseStrategy {

    /// Creates an instance of the `ParseOutput` type from `value`.
    /// - Parameter value: Value to convert to `PhoneNumber` object
    /// - Returns: `PhoneNumber` object
    public func parse(_ value: String) throws -> PhoneNumber {
        // Strip out to just numerics.  Throw out parentheses, etc. Simple version here ignores country codes, localized phone numbers, etc. and then convert to an array of characters
        let maxPhoneNumberLength = 10
        let numericValue = Array(value.filter({ $0.isWholeNumber }).prefix(maxPhoneNumberLength))

        // PUll out the phone number components
        var areaCode: String = ""
        var exchange: String = ""
        var number: String = ""
        for i in 0..<numericValue.count {
            switch i {
            case 0...2:
                // Area code
                areaCode.append(numericValue[i])
            case 3...5:
                // Exchange
                exchange.append(numericValue[i])
            default:
                // Number
                number.append(numericValue[i])
            }
        }

        // Output the populated object
        return PhoneNumber(areaCode: areaCode, exchange: exchange, number: number)
    }

}
In the example above we’re just taking our input string, removing any non-numerics and only allowing ten characters before breaking apart the components. Please note once again this is a simple, non-localized example used to illustrate these concepts.
Adding the Custom Parseable Format Style
Now that our strategy has been defined, we can create a struct with our new PhoneNumberFormatStyle object.
public extension PhoneNumber {

    /// Phone number formatting style
    struct PhoneNumberFormatStyle {

        /// Pieces of the phone number
        enum PhoneNumberFormatStyleType: CaseIterable, Codable {
            case parentheses    // Include the parentheses around the area code
            case hyphen         // Include the hyphen in the middle of the phone number
            case space          // Include the space between area code and phone number
            case areaCode       // Area code
            case phoneNumber    // Phone number itself
        }

        /// Type of formatting
        var formatStyleTypes: [PhoneNumberFormatStyleType] = []

        /// Placeholder character
        var placeholder: Character = "_"

        /// Constructor w/placeholder optional
        /// - Parameter placeholder: Placeholder to use instead of '_'
        init(placeholder: Character = "_") {
            self.placeholder = placeholder
        }

        /// Constructer to allow extensions to set formatting
        /// - Parameter formatStyleTypes: Format style types
        init(_ formatStyleTypes:  [PhoneNumberFormatStyleType]) {
            self.formatStyleTypes = formatStyleTypes
        }
    }

}
There’s a little bit going on here but basically we’ve created an extension on our custom PhoneNumber struct with an enum, constructors, and properties to allow customization of the formatted output.
After creating the base object, we now need to actually implement ParseableFormatStyle and define our formatting. In the code below you can also see us exposing the ParseStrategy that we defined above (for going from String to PhoneNumber) and the format(_:) function where we output a custom string based on the enum and placeholder settings.
extension PhoneNumber.PhoneNumberFormatStyle: ParseableFormatStyle {

    /// A `ParseStrategy` that can be used to parse this `FormatStyle`'s output
    public var parseStrategy: PhoneNumberParseStrategy {
        return PhoneNumberParseStrategy()
    }

    public func format(_ value: PhoneNumber) -> String {

        // Fill out fields with placeholder
        let stringPlaceholder = String(placeholder)
        let paddedAreaCode = value.areaCode.padding(toLength: 3, withPad: stringPlaceholder, startingAt: 0)
        let paddedExchange = value.exchange.padding(toLength: 3, withPad: stringPlaceholder, startingAt: 0)
        let paddedNumber = value.number.padding(toLength: 4, withPad: stringPlaceholder, startingAt: 0)

        // Get the working style types
        let workingStyleTypes = !formatStyleTypes.isEmpty ? formatStyleTypes : PhoneNumberFormatStyleType.allCases

        var output = ""
        if workingStyleTypes.contains(.areaCode) {
            output += workingStyleTypes.contains(.parentheses) ? "(" + paddedAreaCode + ")" : paddedAreaCode
        }

        if workingStyleTypes.contains(.space) && workingStyleTypes.contains(.areaCode) && workingStyleTypes.contains(.phoneNumber) {
            // Without the area code and phone number, no point with space
            output += " "
        }

        if workingStyleTypes.contains(.phoneNumber) {
            output += workingStyleTypes.contains(.hyphen) ? paddedExchange + "-" + paddedNumber : paddedExchange + paddedNumber
        }

        // All done
        return output
    }

}
After doing this we also need to implement Codable (since FormatStyle implements Codable and Hashable) to persist the state of the format style. You can download the source code for this article to see this and more.
We also want to expose methods to allow us to construct a specific format fluently just like the styles built into the latest iOS system objects. Below, the area code, phone number, and punctuation-related methods are defined to do just that.
/// Publicly available format styles to allow fluent build of the style
public extension PhoneNumber.PhoneNumberFormatStyle {

    /// Return just the area code (e.g. 617)
    /// - Returns: Format style
    func areaCode() -> PhoneNumber.PhoneNumberFormatStyle {
        return getNewFormatStyle(for: .areaCode)
    }

    /// Return just the phone number (e.g. 555-1212)
    /// - Returns: Format style
    func phoneNumber() -> PhoneNumber.PhoneNumberFormatStyle {
        return getNewFormatStyle(for: .phoneNumber)
    }

    /// Return the space between the area code and phone number
    /// - Returns: Format style
    func space() -> PhoneNumber.PhoneNumberFormatStyle {
        return getNewFormatStyle(for: .space)
    }

    /// Return the parentheses around the area code
    /// - Returns: Format style
    func parentheses() -> PhoneNumber.PhoneNumberFormatStyle {
        return getNewFormatStyle(for: .parentheses)
    }

    /// Return the hyphen in the middle of the phone number
    /// - Returns: Format style
    func hyphen() -> PhoneNumber.PhoneNumberFormatStyle {
        return getNewFormatStyle(for: .hyphen)
    }

    /// Get a new phone number format style
    /// - Parameter newType: New type
    /// - Returns: Format style
    private func getNewFormatStyle(for newType: PhoneNumberFormatStyleType) -> PhoneNumber.PhoneNumberFormatStyle {
        if !formatStyleTypes.contains(newType) {
            var newTypes = formatStyleTypes
            newTypes.append(newType)
            return PhoneNumber.PhoneNumberFormatStyle(newTypes)
        }
        // If the user duplicated the type, just return that type
        return self
    }

}
We’re done, right?! Well not quite. Just a couple little pieces are left to leverage the .formatted(_:) syntax, used by the pre-defined format styles for Date and Number for example.
public extension PhoneNumber {

    func formatted(_ formatStyle: PhoneNumberFormatStyle) -> String {
        formatStyle.format(self)
    }

}

public extension FormatStyle where Self == PhoneNumber.PhoneNumberFormatStyle {

    /// Format the given string as a phone number in the format (___) ___-____ or similar
    static var phoneNumber: PhoneNumber.PhoneNumberFormatStyle {
        PhoneNumber.PhoneNumberFormatStyle()
    }

}
Putting It All Together
Whew! That was a lot but hopefully you hung in there. So now let’s use the formatter we created for our PhoneNumber object.
let phoneNumber = PhoneNumber(areaCode: "123", exchange: "555", number: "1212")

// Default
print(phoneNumber.formatted(.phoneNumber))  // (123) 555-1212

// No punctuation
print(phoneNumber.formatted(.phoneNumber.areaCode().number()))  // 1235551212

// Just the last 7 digits and the hyphen
print(phoneNumber.formatted(.phoneNumber.number().hyphen())) // 555-1212
What’s really nice as well is that we can now use this custom format style in SwiftUI also to customize TextField output with the new constructors based on ParseableFormatStyle!
struct PhoneNumberTextField: View {

    @Binding var phoneNumber: PhoneNumber

    var body: some View {
        TextField("Phone Number", value: $phoneNumber, format: .phoneNumber, prompt: Text("Enter phone number"))
            .textFieldStyle(RoundedBorderTextFieldStyle())
            .padding()
    }
}
Using a SwiftUI TextField with Custom Formatting
There are some rough edges that we might want to clean up in this implementation but you can see how these new formatters can be leveraged in the UI directly as well as behind the scenes.
Get the Source Code and Explore
We’ve just scratched the surface here of what can be accomplished with the new formatting API’s. As you may have noticed, the default output type doesn’t have to be String and can be any type that makes sense to your use case. By exposing ParseableFormatStyle, ParseStrategy, and other protocols, you can leverage custom format styles to improve your code.
If you want to dig in and try this out for yourself, please feel free to download the source code and play around with a sample project and unit tests. As always please let me know what you think in the comments and feel free to like/follow/share my blog.
If you’ve been programming for any length of time, you’ll likely run across apps or other projects that need major work and revisions to keep going. Maybe your company acquired another company with tons of legacy code. Perhaps you just started a new gig with lots of skeletons in the proverbial closet. Or you’re an indie developer and that old reliable app that has paid the bills is finally showing its age. I’m going to try to help you make the decisions about your apps (or really any code projects) that need this kind of work.
So it’s easy to get overwhelmed initially by the scope of changes needed or the amount of time required to fix everything. Where do you start? Do you just scrap the existing code and start over? Do you try to refactor the legacy code in place and modernize things without creating a new greenfield project? Only you can choose what’s right for your situation; therefore doing so with clear motivations and direction is key.
Before You Start
Leave your emotions at the door – Whether you’re reviewing your own code, programming that you inherited from another dev, or something in between, it’s critical not to come at the problem too attached to (or the opposite, too ready to dump) what’s already there. Assuming that you have decided to make some significant change, making decisions will be easier looking at the code objectively.
Try not to bring preconceived assumptions – While it’s perfectly fine to have a hunch as to which way to rewrite an app, often the discovery process of reviewing an existing piece of code will strongly guide the decision making process (as it should). Let process and analysis drive, rather than your gut, where you can. I’ve seen perfectly good, reusable code thrown out because some developer has carried the “this code sucks” chip on their shoulder entering an app review. It’s also easy to get swept up in new technology hype too early (or stick with older tech too long). While SwiftUI may be awesome, for example, it’s not the hammer that will pound every nail out there. It may turn out that reviewing the code flows the work in another direction.
Understand your options – For what we are discussing here, your choices will range in scale from “do nothing” to “refactor in place” to “start a brand new project”. Regardless of the choice, it’s critical that you (and your team) understand your capabilities as well as your limitations. It’s all well and good if you want to ditch that old Objective-C code and spin a new SwiftUI app but if you haven’t learned SwiftUI or don’t fully understand how Objective-C works, your task will be much more difficult.
Understand the Decision Making Drivers
While there are numerous paths to software project analysis, I’ve found that at their core, planning most coding projects does come down to a combination of the familiar three interrelated factors:
Resources – How much money and how many programmers, designers, etc. can be thrown at a solution? Resources can come in other forms as well (software, hardware, etc.).
Time – When is the project due? What’s your deadline? Obviously important but keep in mind that there are absolute minimums in many cases. The old adage about not being able to make a baby in 1 month with 9 people applies here.
Scope – What has to be included in the finished app or project? Where the choice is refactor or rewrite, it doesn’t have to be an absolute in many cases. You may want to refactor some of an app and totally scrap and redo other parts. Scope can be flexible.
Usually adjusting one or two of these options will force the unadjusted option to change in the other direction. For example, adding more programmers (resource) might mean you can deliver the same amount of work (scope) more quickly (time).
By assessing your options in this light, you should hopefully arrive at a deliverable , or set of deliverables that can be delivered over time (enabling a more Agile approach) that meet your goals. Making the kinds of decisions around reworking an entire app almost always involve some level of compromise on one or more of the above axes, so it’s important to be ready this up front.
As you assess the issues, try to remember these criteria and make sure that you are also weighing the benefits/drawbacks of any changes. Any business (including yourself if you’re on your own) should want to see positive benefits (financial or otherwise) from any expenditures of time or resources. Keep track of the pros and cons as you look at rewrite vs. refactor.
Analyze the Existing Code
Looking through someone else’s (or your own) legacy code may not seem like a good time, but you can learn a lot in the process. Keep an open mind and remember that there is almost always a reason for the code you are reviewing. Coders aren’t malevolent in general; we all however have knowledge gaps, operating pressures, and have to deal with the technologies available at the current time. The mobile app space especially has moved fantastically quickly since the first devices came out; and both Apple and Google continue to rapidly evolve both UI and non-UI paradigms for developers.
There are more different types of refactors and conversions than I can list. Here are some of the main ones that mobile app developers tend to hit most often, along with some related thoughts.
Language Conversion – For example, Objective-C to Swift or Java to Kotlin. Extremely common these days and can be fairly straightforward in some cases but extremely complicated in others. Built-in system tools to convert Java to Kotlin or Xcode add-ons like Swiftify on the iOS side are good but generally only take you part of the way. You should expect significant clean up efforts both in terms of the code as well as being forced to move to different language paradigms (async/await anyone?). Use tools like Cloc to count lines of code by language and help gauge progress.
UI Conversion – With the advent of SwiftUI and Jetpack Compose, it’s very common to want to take entire apps or portions of apps and modernize them. Older apps with nib files or storyboards are prime candidates for these types of refactors. Generally speaking UI conversion doesn’t have to be an all-or-nothing; so that’s probably the biggest thing to keep in mind. Depending on the application architecture as well, it may not be possible to update just the UI without additional refactoring needed to fit the new architecture.
Architectural Refactor – All of the existing apps out there are written with one or more of many different architectures – good, bad, and ugly. Whatever your choice of preferred architecture, you may wind up having to deal with an app that is architected differently, poorly, or inconsistently. Changing an app architecture is usually a very significant step and can have many consequences. Really think about (and comprehend) the benefits and drawbacks of this type of change before jumping off the proverbial cliff.
API Replacement – These types of changes can actually be some of the simplest – if you are able to just swap endpoints and leave it at that. Complications often arise though with situations like changing data models/contracts and moving from one type of API to another (e.g. REST API to GraphQL) which might require new network code or third-party SDK’s.
Cross-Platform to Native (or vice versa) – These are probably less common but do happen as application needs evolve to be more complex or devolve and remove features. Business acquisition and available technology expertise can also play a role here. Flutter, Xamarin, React Native, etc. all have their own unique wrinkles. If you’re new to either cross-platform or native, it’s critical to do enough prep work, proofs of concept, etc. before making hard decisions to avoid any showstoppers or other failures.
That’s enough prep work and thinking. Now get in there and do the fun stuff!
Make the Call
So you’ve decided on your initial goals, reviewed countless files and lines of code, and think you’ve got a few options. Some choices are quick and easy, some aren’t. You think you may be able to get some resources to help but aren’t sure. What’s next?
If you haven’t already done so, get organized. Lay out the pros and cons for each option you identified – both financially and otherwise. Don’t be afraid of including intangibles like improved developer morale, easier maintenance in the future, etc. Try if possible to cast these things in light of how they will help (or hurt) the business that’s running the app.
Then, make a decision! What did you decide? Scrap and rework? Refactor in place? With significant efforts like these, it’s really easy to get analysis paralysis and get sidetracked until the effort itself becomes obsolete or, worse, becomes forced upon you by some outside force (like the dreaded Apple or Google policy update). It’s totally ok to abandon the effort to refactor or rewrite if it’s just not worth it – but do so knowing why and be able to live with the consequences.
Lastly chunk the work if possible – In rare cases and with smaller apps, you might be able to sit down and bang out a new app or fix an old one in a couple days or a week. For any real significant change though, you’ll want to have a game plan. If a refactor is in the cards, try to split the work into reasonably sized pieces that can be potentially released separately to the appropriate app store. If you’re scrapping the app and performing a rewrite, you may need a project plan and a more concrete idea of the steps you will take. Consider a minimum viable/lovable product (MVP/MLP) approach where you release just enough to satisfy your customers while still maintaining velocity.
Going Forward
Future-Proof Your New Code
Think about why your current app is in its current state. Did someone leave old code unattended for too long? Was everything so tightly coupled that pulling one thread of code out collapsed the whole app? Or maybe the app just grew organically into an unmanageable Swiss Army knife of features that no one could find or use?
It seems pretty obvious but try not to make the same mistakes again. Allow for periodic maintenance and schedule regular high-level app reviews to flush out any growing technical debt. Architect new features using patterns that allow for decoupling and replacement of app components without impacting the entire app. The period after WWDC and I/O always bring changes in the mobile app space so these can also be good times to start thinking about the future.
Embrace Change!
I’m not sure about you; but one of the reasons I absolutely love the mobile application space is the relentless, rapid pace of change and learning. Even if you think you’ve written the “perfect” app, it will need to updated. Apps are not “fire and forget” pieces of software despite being deployed out to the app stores all at once. Account for the related maintenance, updates, and even rewrites – and learn to enjoy it. It’s fun and challenging!
WWDC 2021 is behind us and there are so many new and exciting features available to us as developers. One of those areas that has been getting much more love from Apple over the last few years is accessibility. Apple has been making it simpler for developers to test key tools like Dynamic Type, Dark Mode, and more in the simulator. Since Xcode 11, we’ve had the ability to change numerous accessibility settings in the simulator at run-time with the Environment Overrides pop-up sheet below.
Simulator Accessibility Sheet
This was great for debugging but took time to spin up the app in the simulator and didn’t help much in earlier phases such as storyboard setup. Now with Xcode 13, as noted in the release notes, we can finally see many of these same settings live in UIKit storyboards!
Using the Accessibility Window with Storyboards
Just click the accessibility icon at the bottom left of the storyboard window in the canvas button bar; and you can change type size, contrast/transparency, button shape, bold text, and on/off label settings on the fly. If your storyboard uses features that leverage these settings, you’ll instantly see the storyboard adjust to those changes!
Xcode 13 Accessibility pop-up window
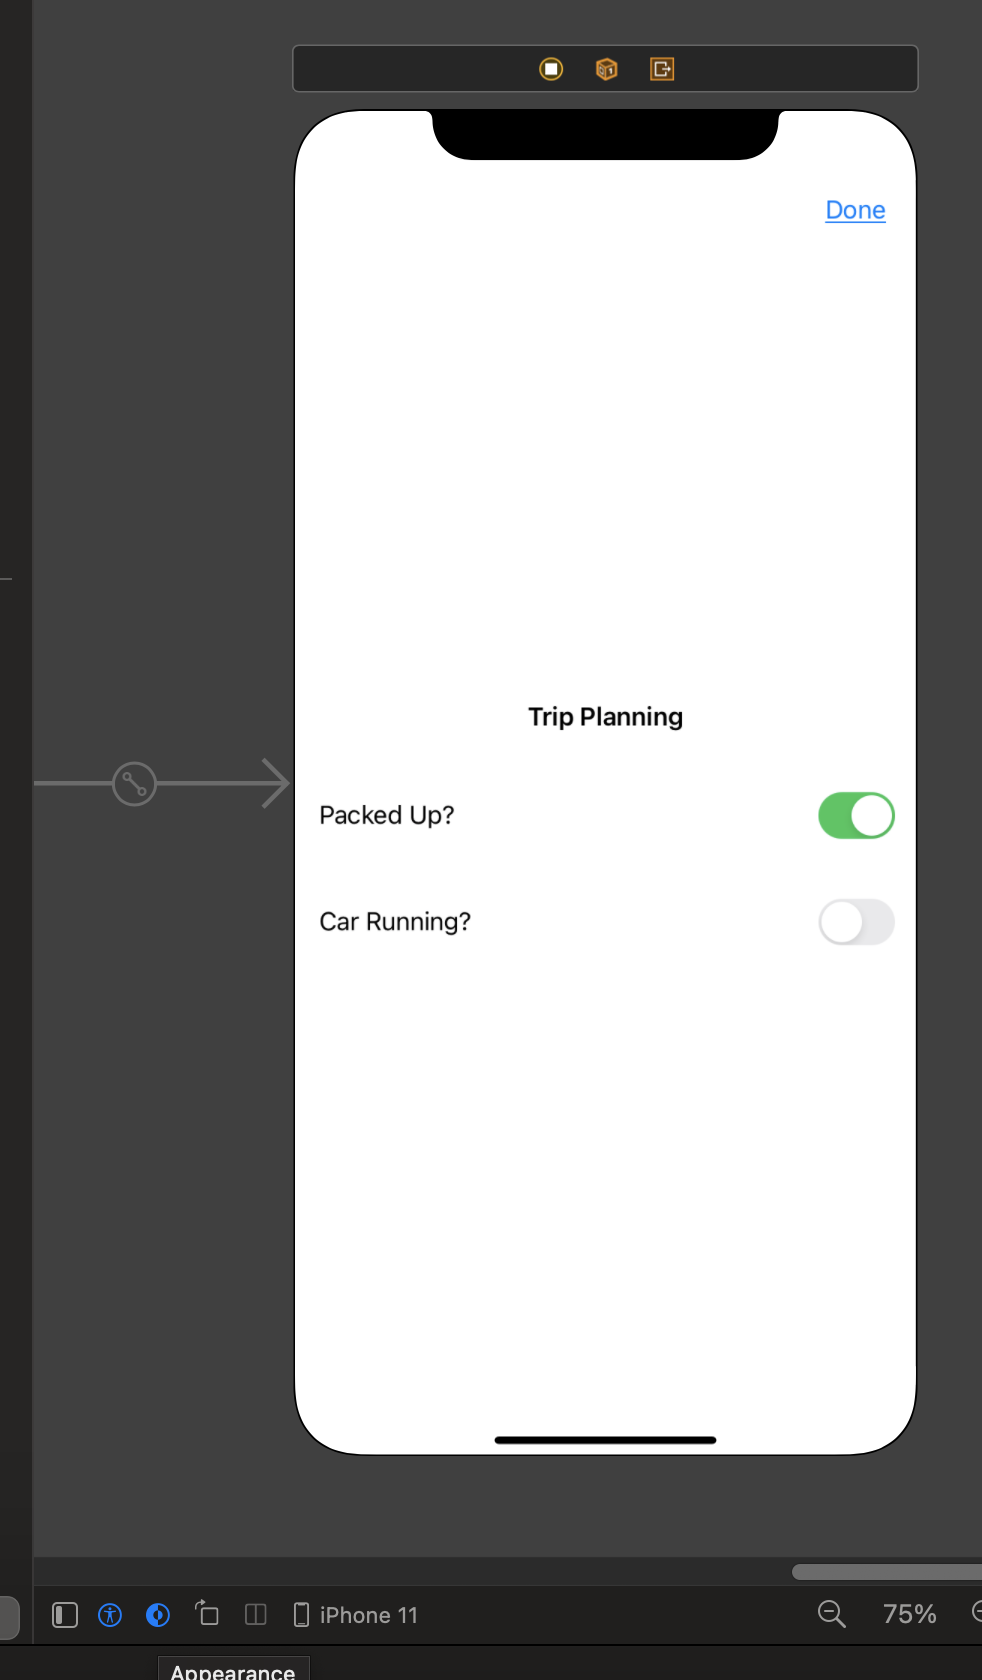
Let’s try some of this out! Let’s look at just a small section of a storyboard with the new icon tapped and Accessibility turned off. Note that you need to flip the Accessibility toggle for any of the settings (slider or checkboxes) to take effect.
Xcode 13 Accessibility disabled
Now we’ll set the Accessibility toggle to the on state and set the Dynamic Type size. Presto! Your storyboard changes on the fly to the larger size so you can evaluate constraints, wrapping, etc.
Xcode 13 Accessibility enabled with larger text size
I have seen a few small issues around this (such as the change not being finalized correctly till you release the Dynamic Type slider) but at this point we are still just on early betas of Xcode 13.
Here’s an example of two of the other settings that can help out your users – On/Off Labels and Increase Contrast. People with color blindness and low vision can benefit from your app supporting these and other features. Note the binary symbols inside the UISwitch controls.
Xcode 13 Accessibility enabled with On/Off Labels and Increase Contrast set
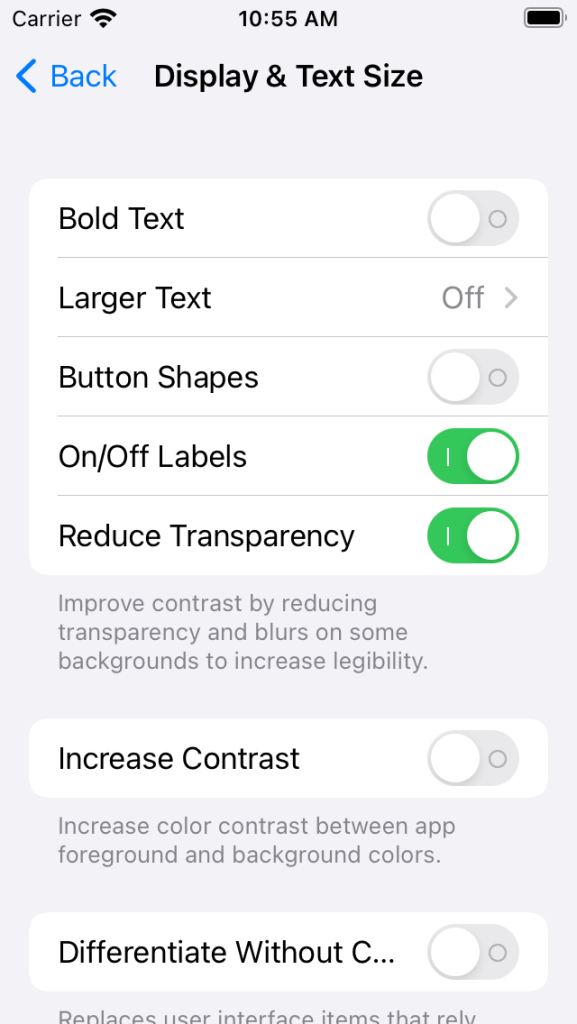
Users wanting these features will typically turn them on in the Accessibility / Display & Text Size menu in iOS or iPadOS as in the image below.
Settings app Display & Text Size Accessibility options
The new Xcode 13 options will now let you preview the UI without having take extra time to build and run the app in simulator.
New Dark Mode Appearance Icon for Storyboards
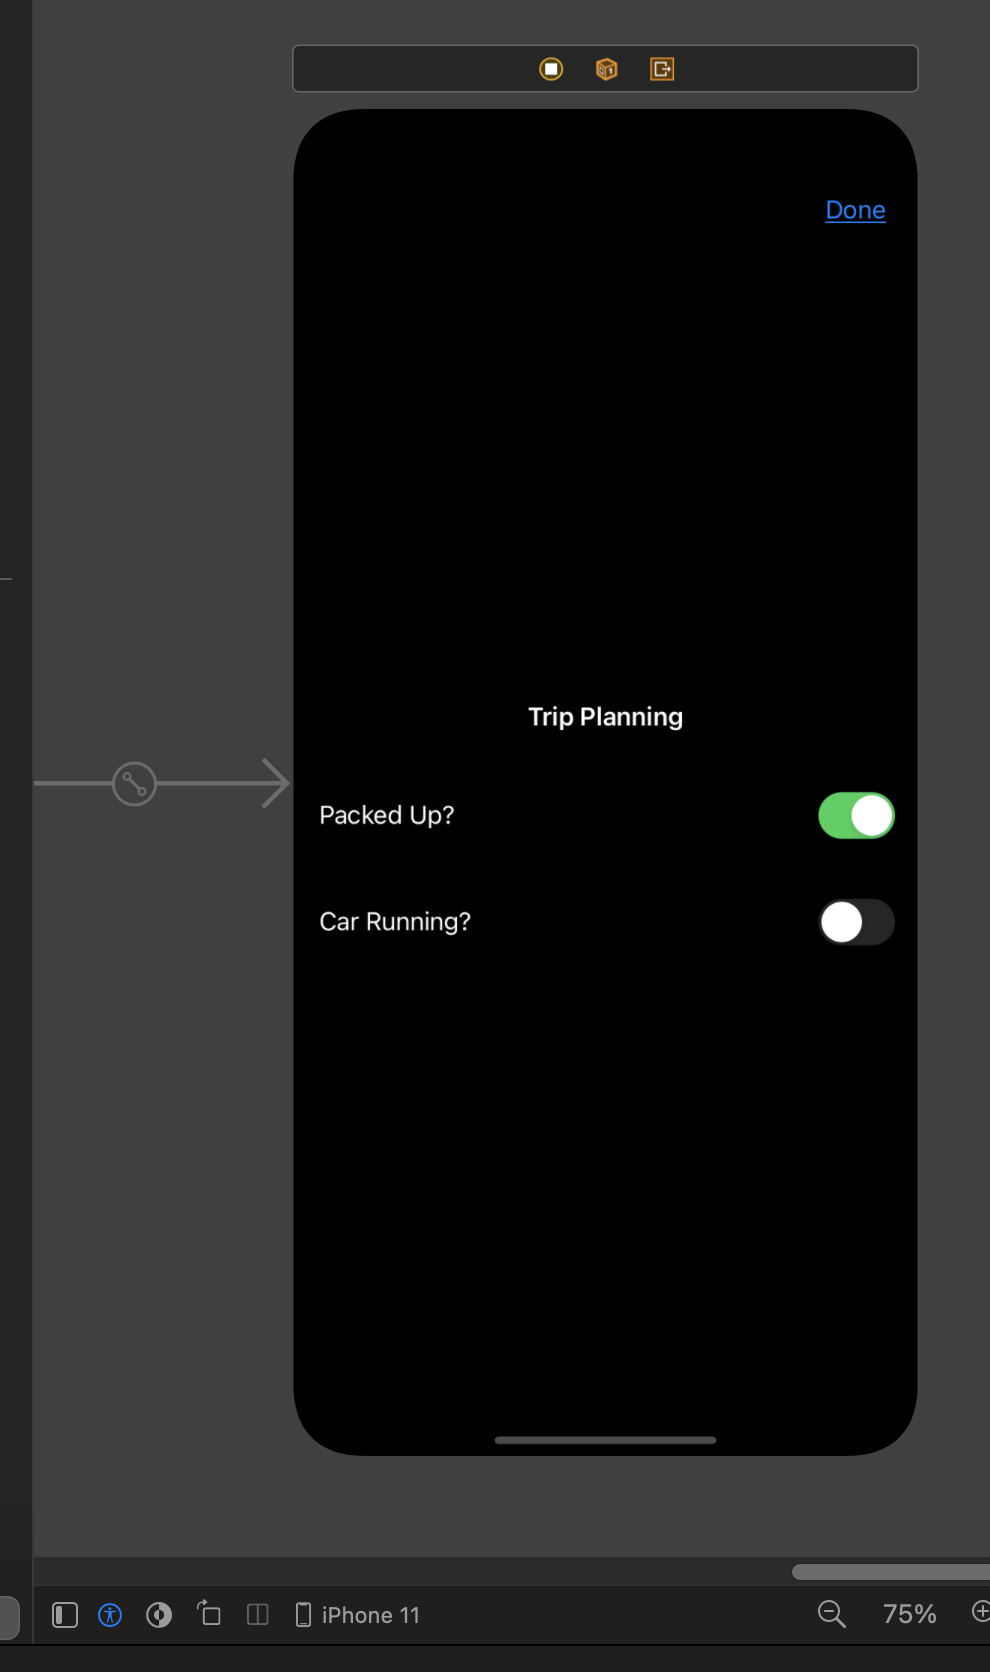
In addition to the above changes, with Xcode 13 we can also click the small icon just to the right of the Accessibility icon to flip the storyboard presentation between Light and Dark Mode. The icon itself is styled identically to the Light/Dark Mode icon available in iOS in the Control Center. Previously in Xcode, you would have to open the “View as” window pane to flip between Light and Dark modes. It’s a small change but one that should save some time for developers.
UIKit Isn’t Dead Yet!
Despite announcing SwiftUI just two years ago at WWDC 2019 and all the push to get on board that train, UIKit most likely still has years of life left. While all the hype around new technologies doesn’t make our choices as developers any easier, Apple announced many new UIKit features at WWDC 2021 and continues to improve Xcode for all developers – and more importantly better the experience for all users.
In my last post, I looked at handling diffable data sources with different types of object data, focusing primarily on the venerable UITableView for my examples. We looked at a simple if...else construct to swap between cell types based on the type of the item from the data source and related snapshot. While this method works with UICollectionView objects and diffable data sources, iOS 14 introduced a brand new way to define and configure your reusable collection view cells that opens up some new options.
Setting Up the Collection View
Like last time, we’ll set up Apple, Orange, and EmptyData structures to hold our sample data. These are just a couple heterogenous data structures to use with our data.
struct Apple: Hashable {
    var name: String
    var coreThickness: Int
}

struct Orange: Hashable {
    var name: String
    var peelThickness: Int
}

struct EmptyData: Hashable {
    let emptyMessage = "We're sorry! The fruit stand is closed due to inclement weather!"
    let emptyImage = "cloud.bold.rain.fill"
}
This time however, we want to declare and instantiate a UICollectionView inside our view controller. Below we are identifying our possible sections as well as calling our “bad weather” data retrieval function, which will simulate an asynchronous pull of data from an API or other source to populate the sections. While many of the examples out there for diffable data sources have hard coded the section data, I think it’s more useful to have some code that mimics more typical scenarios.
/// Simple sample diffable table view to demonstrate using diffable data sources. Approximately 33% of the time, it should show "bad weather" UI instead of apples and oranges
final class DiffableCollectionViewController : UIViewController {

    var collectionView: UICollectionView!

    enum Section: String, CaseIterable, Hashable {
        case apples = "Apples"
        case oranges = "Oranges"
        case empty = "Bad Weather Today!"
    }

    private lazy var dataSource: UICollectionViewDiffableDataSource<Section, AnyHashable> = makeDataSource()

    override func viewDidLoad() {
        super.viewDidLoad()

        collectionView = UICollectionView(frame: view.frame, collectionViewLayout: layout())
        collectionView.dataSource = dataSource

        ...<layout and other code>...

        // Just a silly method to pretend we're getting empty data every 3rd or so call (for demo purposes every 3 days or so we get rain at the fruit stand)
        let badWeatherDay = Int.random(in: 0..<3) > 0
        badWeatherDay ? getData() : getEmptyData()
    }
We’re also going to extend our UICollectionViewCell code to make our life a little easier and encapsulate the actual cell label and background changes. The function below simply takes some text and a background color for the cell using the new UIListContentConfiguration from iOS 14. This new object makes it much simpler to define collection items meant to be utilized in lists and similar scenarios.
extension UICollectionViewCell {
    /// Just set up a simple cell with text in the middle
    /// - Parameter label: Label
    /// - Parameter relatedColor: Color associated with the data
    func configure(label: String, relatedColor: UIColor) {
        //Content
        var content = UIListContentConfiguration.cell()
        content.text = label
        content.textProperties.color = .white
        content.textProperties.font = UIFont.preferredFont(forTextStyle: .body)
        content.textProperties.alignment = .center
        contentConfiguration = content

        //Background
        var background = UIBackgroundConfiguration.listPlainCell()
        background.cornerRadius = 8
        background.backgroundColor = relatedColor
        backgroundConfiguration = background
    }
}
Defining and Using Pre-Configured Cells
Now that we’ve got our prep work out of the way, we can get to some of the new, exciting capabilities from iOS 14. Prior to these changes, you most likely would have used dequeueReusableCell(withReuseIdentifier:for:) to pull and configure a collection view cell with which to work. New in iOS 14 however is the ability to create a cell registration with UICollectionView.CellRegistration. With this we can move our configuration code out of the usual spots, refactor things, and use the registration as a variable. This generic object is defined as follows.
struct CellRegistration<Cell, Item> where Cell : UICollectionViewCell
UICollectionView.CellRegistration expects a collection view cell with which to work and an item to use to configure the cell. This is great because it vastly simplifies some of the pain associated with managing state and pulling the correct item for the currently selected index path. If we look a little more closely at the initializers for UICollectionView.CellRegistration we can also see that it can be defined with either a code-based handler or with a nib file (which can come in handy for some complex layout scenarios, legacy code, etc.).
public typealias Handler = (Cell, IndexPath, Item) -> Void

public init(handler: @escaping UICollectionView.CellRegistration<Cell, Item>.Handler)

public init(cellNib: UINib, handler: @escaping UICollectionView.CellRegistration<Cell, Item>.Handler)
So getting back to our example with our fruit stand, we just need to define three unique cell configurations to handle each possible data scenario.
Updating the Collection View with Pre-defined Cell Configurations
Since we have created our cell configurations, we’re now ready to dequeue these configurations as appropriate as we create the UICollectionViewDiffableDataSource. We’ll do this by calling dequeueConfiguredReusableCell(using:for:item:) with the appropriate cell configuration in the using: parameter. As with the table view example from the last blog post, we’re just examining the item to determine which cell configuration to use.
        let dataSource = UICollectionViewDiffableDataSource<Section, AnyHashable>(collectionView: collectionView) { collectionView, indexPath, item in
            if let apple = item as? Apple {
                //Apple
                return collectionView.dequeueConfiguredReusableCell(using: self.appleCell(), for: indexPath, item: apple)
            } else if let orange = item as? Orange {
                //Orange
                return collectionView.dequeueConfiguredReusableCell(using: self.orangeCell(), for: indexPath, item: orange)
            } else if let emptyData = item as? EmptyData {
                //Empty
                return collectionView.dequeueConfiguredReusableCell(using: self.emptyCell(), for: indexPath, item: emptyData)
            } else {
                fatalError("Unknown item type")
            }
        }
In the above example, appleCell(), orangeCell(), and emptyCell() are simply the functions defined earlier that return a UICollectionView.CellRegistration<UICollectionViewCell, Item> instance.
Whenever we get data back from our API or data source, we can just call our updateSnapshot function to update our UI.
    /// Update the data source snapshot
    /// - Parameters:
    ///   - apples: Apples if any
    ///   - oranges: Oranges if any
    private func updateSnapshot(apples: [Apple], oranges: [Orange]) {
        // Create a new snapshot on each load. Normally you might pull
        // the existing snapshot and update it.
        var snapshot = NSDiffableDataSourceSnapshot<Section, AnyHashable>()
        defer {
            dataSource.apply(snapshot)
        }

        // If we have no data, just show the empty view
        guard !apples.isEmpty || !oranges.isEmpty else {
            snapshot.appendSections([.empty])
            snapshot.appendItems([EmptyData()], toSection: .empty)
            return
        }

        // We have either apples or oranges, so update the snapshot with those
        snapshot.appendSections([.apples, .oranges])
        snapshot.appendItems(apples, toSection: .apples)
        snapshot.appendItems(oranges, toSection: .oranges)
    }
Setting Up Header and Footer Configurations
Just as with collection view cell registrations, iOS 14 lets us create supplementary registrations for headers and footers as well. By creating a UICollectionView.SupplementaryRegistration with any UICollectionReusableView, you can easily modernize how your collection view sections are defined. In the code below, we’re setting up a header for each section with the value of the section type from the snapshot.
With iOS 13 and especially iOS 14, Apple has totally revamped how collection views can be created with compositional layouts and diffable data sources. I’d strongly recommend checking out Implementing Modern Collection Views in the Apple developer documentation and exploring everything that has changed with collection views. While SwiftUI with the LazyHGrid and LazyVGrid are here and available for presenting collections, the trusty UICollectionView still has plenty of life left and may be able to meet your unique needs!